Showing posts with label project. Show all posts

Monday, October 19, 2015

We Did the Volcano Thing


One of our awesome, amazing, lovely family members got us a subscription to something really cool thing that I didn't even know existed. If you're homeschooling, you might love this, too. It's the Magic School Bus, Young Scientist Club.

We've been receiving their bubble-packed envelopes for most of a year, and I can now tell you that they are definitely worth it. If I were a little better at planning, I could organize our school schedule to focus on the topics in that month's Magic School Bus kit. They email in advance to let you know what the topic will be and what you will need in order to perform the experiments. Unfortunately, as I have detailed before, my life is a bit of a mess lately... sometimes it feels like an endless train wreck that I can do nothing to avoid, and just have to clean up after when the dust finally settles. So, there are envelopes we haven't opened and experiments we haven't done.

Some of the "experiments" aren't really... experimental. In one of our first envelopes, we got (among many other things) a card-stock print of a leg, cut in half at the knee, a couple of bits of string and a brass brad. We attached the two leg segments with the brad and taped the ends of the pieces of string so that one end attached to the lower half and one to the upper. I gather this was supposed to replicate the muscles moving the parts of the leg. As a biologist-in-training, I felt the need to explain that this was very simplified and... not really how this works. Still, it was a great conversation starter that resulted in education points that don't generally come up on their own.

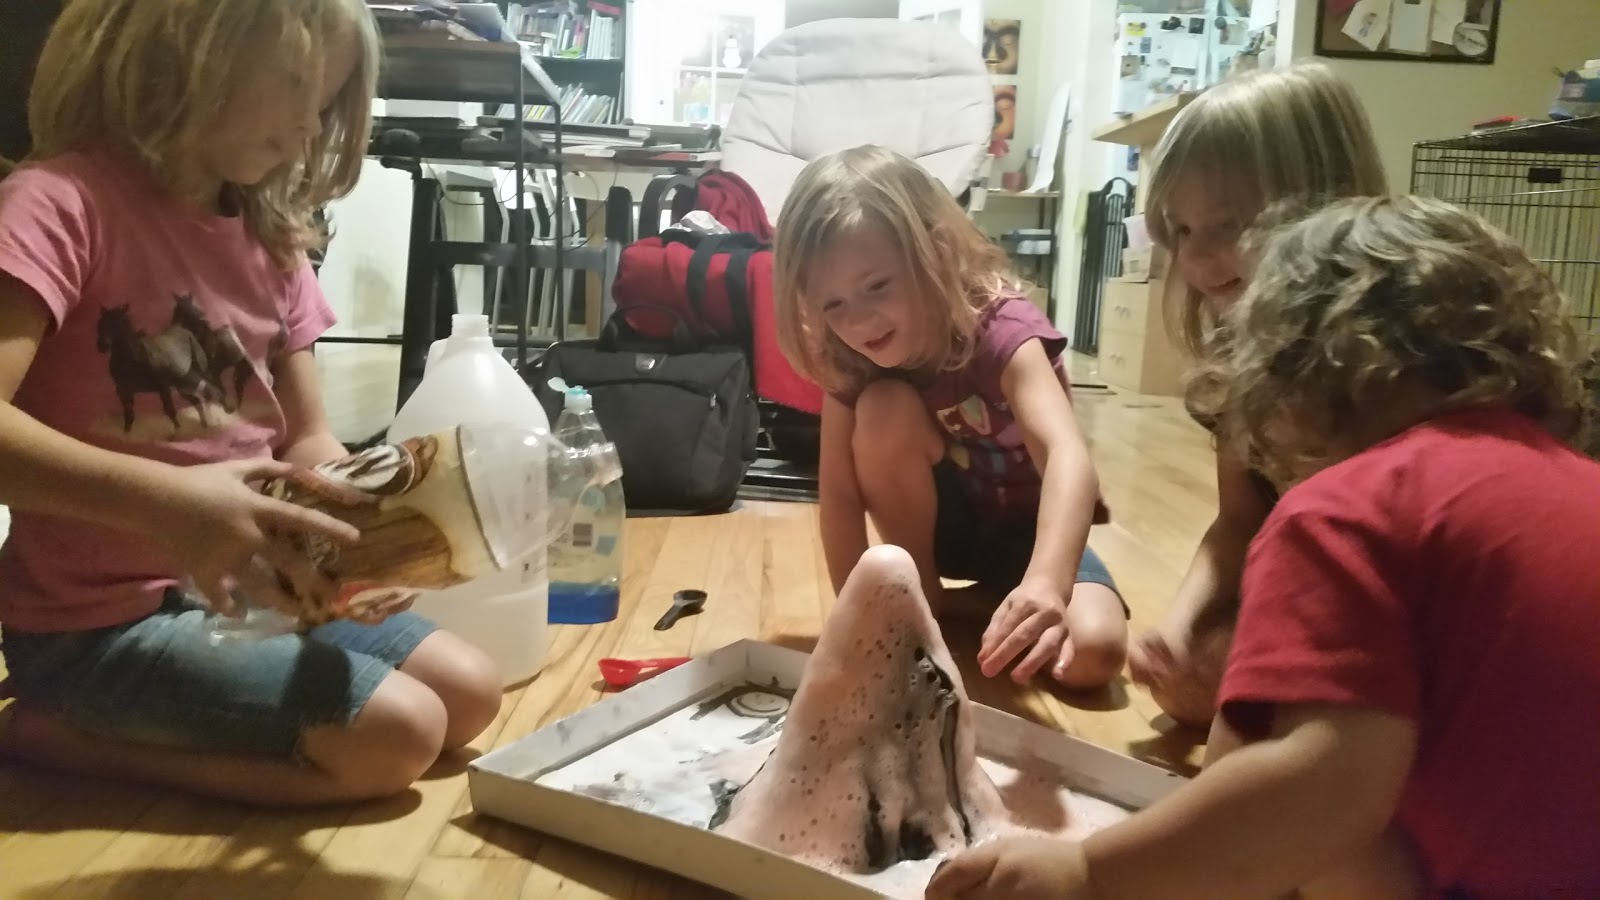
My favorite so far was the most stereotypical science fair experiment ever: making and erupting a volcano. (obviously, there's a reason people love this one)

The instructions for the volcano experiment come in different phases. First, you build the structure with a small soda bottle and paper mache. The instructions are specific about what size of bottle, so you don't end up with a bottle too big for your solution to explode from. The kit doesn't include the bottle, but does come with tough construction paper to build your cone-shape and some powdered black paint. A lot of what you need comes from your kitchen: Flour, water and a bowl to make your paper mache, and vinegar, baking soda, red food coloring, soap and measuring cups/spoons for the "lava".

After you've built the volcano, your kids will slowly become more and more impatient before (maybe) just giving up all together, while you wait for it to dry completely before using it. It takes... days. You build it and you wait a long time... then you paint it and you wait another long time. Or at least that's how ours went. It's possible that my kids were overzealous with the mache and paint. They were incredibly excited about the project.

But before you explode your volcano, you've got some work (read: learning) to do. I bet you thought you were just going to follow some directions with specific quantities and get the perfect, explosive solution. Not so fast. The Magic School Bus directions don't make it that simple. Instead, they tell you what to put in, but not how much, and give you a few different blank spaces to write out what you used each time so you can come up with the ideal solution on your own. (we used a camelback bottle for our preliminaries so the kids could see what was happening inside)

I think that was the best part. We talked about how baking soda and vinegar react with one another and explained that you could use that knowledge to figure out if you needed more baking soda or more vinegar. Take the puddle of already reacted mess and add a little baking soda to one area. Does it react a lot? Now add vinegar to another area. Does that react more or less?

We came up with our perfect solution and put it in our volcano. It was amazing, and even the Cub loved it. And with all of those mixture tests we did on the front room floor, the hardwood is super sanitary now.


Friday, January 3, 2014

The 2014 Memory Jar

On New Years Eve, as we were tucking the girls in for bed, we told them it would be a whole different year when they woke up. The previous night, we had talked about why New Years Eve is a special day. "It's the last day of the year," I said, "and we like to take time to remember all of the things we did this year and look forward to what we will do next year."

365 days is a lot of time for six or four-year-old to try to reflect on. They do a fine job recapping the last chapter we read in Charlotte's Web, or remembering what their gymnastics coach taught them last week. But when I say, "one year ago, I had just come home from the hospital with your baby brother." they remember that it happened, but have no sense of when. They might remember the carnival in the mall parking lot if I described it to them, but I doubt they would remember their first experience piping frosting. Of course, I'm sure the twins remember things more clearly than M.

Somewhere amid the discussion, I heard one of the twins grumble, "A year is a really long time!" When you've only lived through six of them, the scale must be vastly different than after twenty-six. Besides, their world is so full of excitement and fun that I imagine it's hard to retrieve all of the little pieces by the end of the year. So, I resolved to make a memory jar this year. Using a clean spaghetti sauce jar (I saved a bunch of them a year or so ago) with a new label I made myself, I created a sort of time capsule we'll use all year. At the end of the year, we'll look at all of the pictures and notes in the jar and then close it and save it for the kids to look back on when they're older.

Our first memory went into the jar on the first day of the year. I took a picture of all of the kids with Papa's mom and step-dad (who visited for New Years), printed it, cut it out, and wrote the date and a one-line description on the back. I decided to fold it so the date showed and the picture was inside. Now, when we sort through the memories at the end of the year, we can set them out in order by date before reading and opening them. We can revisit the year as it happened.

I wish I had been doing this all along. Better late than never, I suppose.

Friday, October 25, 2013

Sew Elastic to Sleeping Bags

All this time, I thought sleeping bags all had two elastic loops attached to the foot for securing them in that cinnamon roll shape when you store them. Some months ago, I ordered some beautiful sleeping bags for all of the girls. When I pulled them out, I was surprised to find that they came with the elastic loops I was used to, but they weren't attached.

I learned that my mom sewed those loops to the foot of my sleeping bag so I wouldn't lose them on Girl Scout trips. So, I planned to do the same.

I kept procrastinating. It was a small project, and it didn't seem that important. It could wait. I was kind of burned out on sewing after making blankets for M and the Cub. I had crochet projects to do. Trust me, I could go on listing excuses I made for myself. Of course, it didn't help that no one else cared if it was done. There's nothing like a total lack of accountability to help you procrastinate like a pro.

Recently, the girls were pretending to be winter fairies (thanks, Tinkerbell) and couldn't be in the sun. I found them all cowering under an arrangement of child-sized umbrellas, just outside of the shadow cast by the patio roof. These are the adorable eccentricities of childhood play.


That seemed a good enough excuse to pitch the tent in the back yard for a day or two. I guess you can't have a tent without sleeping bags. Without much thought, I put all of the elastic loops in a hanging pouch attached to the tent and told the girls to leave them there. Still, despite my instructions, the elastic loops became princess tiaras and who knows what else just before they became... scattered across our property.

It was definitely time to permanently attach them.

Once I located all six loops, I set up the sewing machine and, soon, wondered why I hadn't done it before.

Mark where you will attach your loops. I used a Crayola marker. I have Crayola markers in abundance and they wash out extremely easily. To determine where your loops should be, roll your sleeping bag the way you typically would, including strapping the elastic loops on, then mark where the loops overlap the outer-most segment of zipper. Mark at the seam between the zipper and the sleeping bag fabric.

Open the sleeping bag and pin the loops to the zipper edging on one side. You are going to sew as far away from the zipper (and as close to the seam) as you can manage. I deliberately pulled a bit of the inner sleeping bag material into my pinning. I wanted to add an extra bit of security to the stitch. I'm not sure if that made any difference, though.

Sew it all together. Take your time. Sleeping bags are puffy and unwieldy. It is very easy to end up sewing layers you didn't mean to. Also, be thorough. I did four passes. Remember that these are going to be pulled on a lot.

Of course, you could seam rip where you intend to attach the loops. I considered doing that myself. It seemed a bit excessive and I wasn't sure I'd be able to put it back together satisfactorily.

Now, when you roll up your sleeping bag, make sure to roll from head to foot, so the elastics are on the finishing end. When you get to the finishing end, your loops will be easy to wrap around the whole roll.


It took about 15 minutes for me to do this to all three sleeping bags. I honestly can't believe I didn't just do this the day I got them. Now, I don't have to worry about anyone (anyone) losing the elastics.


Saturday, November 24, 2012

Leaf Mobile

This is the first autumn my kids have really been able to experience the falling of colorful leaves. The twins were born in Colorado, in February. Since then, though, we've lived in Texas and Hawaii mostly. They were really excited to see all of the colors on the tree right outside their window, and I was actually surprised to see how much fun they had leaf hunting. They especially loved the red ones.

They wanted me to save a bunch of them, and I just happened to know how. After preserving them, I used them to make a falling leaves mobile, which they love.

To be clear, this mobile is NOT kid proof. I hung mine up near the ceiling. The leaves are preserved, but not protected against crushing damage.


Things you need:

Freshly fallen leaves
Newsprint
Mod Podge
Paint brush
Thread
A stick

How we did it:

Press Leaves - Lay fresh, supple leaves between layers of newsprint, and put something on top to weigh it down. Newsprint is more absorbent than most other printed paper, so it helps keep the leaves from retaining their moisture. I used the voter information booklet that was mailed to me (after I read it). You should weigh it down evenly. I put the booklet under my bamboo cutting board so it was out of the way, and evenly smashed. They should stay here for a week or two. The air is super dry in Colorado, so it only took about a week.

Seal Them - Paint an even layer of Mod Podge on both sides of each leaf. I applied two coats to each, allowing them to dry completely in between. Their color came back, and they regained some of their flexibility.

Hang Them - There are probably a lot of things you could think up to do with the leaves at this point. What I did was string them to a stick using beading thread. Another idea is decoupaging a jar to make a pretty candle holder like this.

Saturday, November 3, 2012

DIY Shrinky Dinks


The plastic for this was hard to come by, to be honest. #6 is difficult to recycle in Colorado, so there isn’t really a lot of it. Other people’s blogs were suggesting that you could get it at the salad bar in a grocery store, or the bakery. But, one day as I was waiting on a prescription to be filled, I checked all of the plastic containers in that side of my grocery store and found that only the deli containers with the black bottoms had clear, #6 plastic lids. And I don’t buy fried chicken.

I experimented with this project and learned a few things I’ll share with you at the end.

Things you need:

#6 clear plastic
Permanent markers (colors of your choosing)
Scissors
Hole punch (if you want to make charms)
Parchment paper
Cookie sheet

How we did it:

Acquire plastic - Seriously, this was more complicated than other bloggers made it seem. Maybe it’s because I live in Colorado. Take out doesn’t come in plastic, and grocery store muffins come in #1s. It’s hard to recycle #6 around here, and people care about recycling, so the only things that I could find in #6s were the deli foods I literally never buy (I scouted the store in my free time). So my partner asked the deli guy if we could just have some #6, clear plastic lids “for a science experiment” (with kids in tow). He was clearly a bit confused, but gave up a stack of lids without a fuss. Win.

Preheat your oven - Preheat to 250, now or later. I never preheat first thing because it always takes me longer to prepare than it takes my oven to preheat. Besides, 250 is SO low.

Cut and/or color - First, cut your plastic so that you have a plain, flat piece. Then, depending on what your plan is, either color the plastic or cut it into the shapes you want. I used the plastic to make necklace charms for each of my kids with my phone number and my partner’s, so they are equipped to get help if they ever get lost. For that, I cut out the shapes I wanted, then wrote the information on the plastic. I’ve seen really attractive charms made by letting small children color a whole sheet of plastic, then cutting it into identical shapes.

Tip: Cut the pieces about 6 times the size you want them to end up. Trust me.

Hole punch - Only if you want a charm. This might be a step you want to do after cutting and before coloring, if you’re doing a more planned-out piece like I was. Otherwise, it can be done after.

Tip: When the plastic shrinks, it also thickens, so the holes don’t need to be as far from the edge as you might think. The pieces become quite sturdy.

Bake - Line a cookie sheet with parchment paper. I’m not sure if it would be a problem if you didn’t, but I didn’t want to find out. You can reuse the parchment paper for more shrinks if you want.

I can’t tell you how long to bake them. It’s a quick process (my largest pieces took only a few minutes). It depends on the size of the plastic piece, it seems. Just watch them. They will curl up a lot. You might worry that if two parts of hot plastic touch each other it’ll be ruined. It’s fine. Then, they uncurl. When the pieces are all completely flat again, they’re done. You might want to bake similarly sized pieces together and avoid mixing sizes. I didn’t wait to see what would happen if I left them in longer than they needed.

More Tips: Experiment with this. I learned that they work better if they curl upward instead of down at the edges. For my lids, they always curled in the same direction (toward the top/outside of the lid). They also always seemed to shrink more in one direction than the other. I found that I could see faint striations (lines) in the plastic and that the greatest shrinking happened against the striations. So if you want all of your pieces to come out the same size and shape, cut them the same size and in the same direction on the plastic.

Also, seal them. My kids were playing with their charms and rubbed off part of the marker. I don’t have anything to seal them with just yet, but I’m planning on getting some spray sealer. I hear that works just fine. I’ve also heard clear nail polish works, but check that it is non-acetone before you try.

This project is adapted from RustSunshine with modifications and additional information based on my experience.


Saturday, October 20, 2012

Falling Leaves Diarama

This one was just for the twins, so we did it while M was napping. It’s a great refrigerator-hanging art piece. We finger painted leaves on the trees, so they had a lot of fun with it.

Things you need:

• Printed Falling Leaves Template (Link will open in new window)
• Construction paper
• Sandwich-size zip-lock baggie
• Hole punch (optional)
• Pencil
• Scissors
• Glue
• Markers, crayons, or paint

How we did it:

Cut or color - You can do either first. I cut out the tree shapes first so I could cut the square and hole punch the “leaves” while they were painting and reduce wait time. You could just go for being prepared with a bowl full of “leaves” before you get started.

Of course, whatever you did first, you do the other one second. We colored the trunks and the ground with markers and finger painted leaves on the tops of the trees. I have to say, I’m pretty impressed with the way they turned out. I used disposable pie pans for paint and color mixing.

Hole punch - Like I said, I did this while the kids were painting. I used red, brown, orange and yellow construction paper (one sheet each) and punched... really a lot of holes in them. I have a 3-hole punch, so I lined up all four sheets of paper and punched once, then slid the paper down a bit and punched again. Just keep doing that until you’re satisfied. If you have a one-hole punch, it will still work, but... I’m sorry.

You will also use the square part of the pattern to cut out a blue square of construction paper at this point. Again, unless you were more prepared than me and already did this.

Put it together - We painted, so I let the trees dry while the kids napped. Then, I put what seemed like a reasonable amount of hole-punched paper in two ziplock bags. I used freezer size because that was all I had. It turned out fine, except freezer bags aren’t quite as transparent as sandwich bags. Zip the bags shut.

Next, I used tape, circled sticky side out, (you can use glue) to put the pieces together. I taped the trees to the front of the bag and the blue squares to the back (only taping where the trees would cover it).

I probably could have let them use the square pattern piece to cut their own blue sky... they probably could even have punched their own leaves. But I imagine they would have gotten bored of that.

Saturday, October 13, 2012

Pine-Cone Bird Feeders


I paired this project with talks about why birds benefit from bird feeders, particularly in the fall and winter months. This was super easy. A my five-year-olds could have done the whole thing on their own, but we cut and tied the strings for them anyway. My two-year-old also managed to do everything but cut and tie. The feeders have been up on our balcony and have already been visited by birds, which the kids find exciting.

Things you need:

Pine-cones
Smooth peanut butter
Bird seed mix
Twine
Spoons
Scissors

How we did it:

Tie pine-cones - Do this before you put anything on the pine-cone. You won’t want to stick your fingers in the mess later. Cut the twine to the length you want. If you don’t know where you’ll be hanging it, be liberal with length. Tie one end of the twine around the stem of the pine-cone, below the first row of horizontal spokes. If you tie the twine to the stem, above the horizontal pieces, it could easily slip out.

You can also tie the center of your twine around the pine-cone and tie the ends together if you want a loop to hang.

Butter it up - Provide smooth peanut butter on a plate or in a bowl, and a spoon, to each kid. Explain that they want to thoroughly coat the outer parts of the pine-cone and let them get started. This part is remarkably easy. I thought of using butter knives, but the curve of the spoon seemed to help them get a thicker layer of peanut butter.

Roll it in seed - We used a small cookie sheet with a raised edge as our seed tray. It doesn’t take very much seed, but I can’t tell you exactly how much you’ll need. Pour a pile of seed out and let each kid take their turn rolling their peanut buttered pine-cone in it. This is also incredibly easy.

Hang it up - Think like a squirrel... and try to outsmart yourself. We hung ours from plant hooks on the eve just outside the sliding door to our balcony. This seemed like it might have been a problem, but we used a pretty generous length of twine, so the squirrels can’t reach the pine-cones from the roof, the floor, the rail, or anywhere on the wall. Also, we have two large dogs who love an opportunity to chase a squirrel.

birdfeeders.com (Link will open in new window) says, “Hang your bird feeder away from trees, bushes, fences or buildings. Squirrels and other predators may use these to climb or jump onto the bird feeder. If you must hang the bird feeder on a tree, keep it at least six feet from the trunk or the tree limbs.”

Friday, September 21, 2012

Fossils


This was our first lesson-related project. We talked about dinosaurs, watched informative videos, went to the museum, and made fossils. It was a lot of fun, and really easy. I imagine we’ll make this dough and use it for something else in the future.

Ideas for future use of this recipe: Christmas ornaments, hand print wall-hangings, first pottery attempts, leaf prints maybe.

Things you need:

1 box baking soda (about 2 cups)
1 cup cornstarch
11/2 cups water
Sauce pan
Bowl
Spoon
Plastic wrap (optional)
Waxed Paper (optional)
Dinosaurs

How we did it:

Make your dough - Mix the baking soda, cornstarch and water in a saucepan and cook over medium heat, stirring constantly, until it is too thick to stir with a spoon. Seriously, constantly. This only takes 10 minutes or so. When it starts to thicken, it will get to the right consistency very quickly.

Let it cool - Cool in a bowl until the dough is cool enough to touch. Knead it for about 5 minutes, or until smooth. Keep any dough you’re not using wrapped in plastic.

Paper your table - I recommend taping down some waxed paper before you give the dough to little hands. It is pretty easy to clean up, so you don’t absolutely have to, but it does make clean-up faster, and give you an easy way to move your finished projects.


Get prehistoric - We delved out approximately equal portions of dough and put a basket of plastic dinosaurs in the middle of the table. This clay is good for lots of things, but we were just finishing up a week of dinosaur lessons.
The kids stamped skin patterns, faces and feet. Then, they rolled their dough up and made snowmen and dinosaur armor. Finally, they made fossils again and we let them dry on the kitchen counter. They take 1-2 days to dry, depending on how thick it is, and it can be painted with Tempera or acrylic paints.

Tips - You probably shouldn’t let these dry entirely on the waxed paper. The paper will hold the moisture in on the bottom. Also, you’ve got probably about a half hour between the dough reaching a tolerable “warm” temperature and when it will start to dry enough to be chunky and difficult to reform. And you should know before you start: this stuff is super easy to wash off. It will feel weird and grainy on your hands, but it comes right off without any trouble.

Saturday, September 1, 2012

Fall Leaf Sun Catcher Project


Each season I like to do a project with my kids that I can hang up all season long. For Spring, I cut pieces of construction paper to look like parts of flowers (stem, leaf, petal, and to keep it simple, just a circle piece for the center) and let them make flowers, or not. The results were interesting.

C made flowers... basically as many as she could fit on her paper. S made an interesting abstract array of pieces that still looked fairly well thought out. M mostly got practice using a paintbrush to apply diluted glue to pieces of paper, so hers was a bit of a mess. They’ve hung on the freezer door ever since, because I find them so interesting.

In the summer, we painted bird houses. But now it’s fall and it’s time for something different. We made fall leaf sun catchers, and it was fun for my five-year-olds and easy enough that my two-year-old could make one of her own.

Things you need:

crayon shavings (sharpen some crayons to get nice, thin shavings)
waxed paper
black construction paper
leaf shape template (we used this one)
glue
scissors
iron (additionally, ironing board and towel)

How we did it:


1. Pick out colors - We let the kids help us choose colors for the leaves, after we talked about what happens to leaves in the fall. We tried to guide them toward picking colors that leaves might actually be by showing them pictures, since autumn colors haven’t really begun to show here. They chose brown, purple, red, orange, and yellow.

I got out five pinch bowls and let them help me choose three crayons from each color group to gather shavings from. These color-picking steps were fun and educational for my two-year-old as I don’t think she thinks much about how many different shades of purple there are.

2. Sharpen crayons - For this, we sent the kids to play. After letting them pick three of each color, we stuck ourselves with 15 crayons to sharpen, dropping the shavings into color-separate bowls. But we had time, and this is easily accomplished with two sets of grown-up hands and some conversation.

3. Print and cut a leaf template - This can be your first step if you want. I’m glad I did it after the crayon sharpening because cutting the leaf shape out with my x-acto knife made the pad of my thumb hurt a bit.

I used scissors to cut a square around the leaf template, with a bit of space between each point of the leaf and the edge of the paper. Then, using that square as a guide, I cut similar squares from black construction paper and waxed paper.

You will need two squares of construction paper, and two sheets of waxed paper, for every leaf.

Next, I used my X-acto knife to cut the leaf shape out of the center of the construction paper. Only cut the leaf shape out of the construction paper, not the waxed paper. You can use scissors, but I suggest using a simpler leaf shape than the one I provided if that is your plan. I started out thinking I was going to use scissors on my maple leaf with all of it’s wiggly lines. That... did not happen.

Tips - I recommend making your waxed paper squares bigger than your construction paper squares so the melted crayon doesn’t seep out of the edges. You can always trim it later. Also, use a clip of some kind to hold the waxed paper to the template while you cut it. Waxed paper is unruly and annoying in certain ways.

4. Scatter the colors - We brought the kids back for this, and did it on the ironing board, so we wouldn’t have to move it after they had arranged their colors. They sat on dining chair and scattered the colors they chose onto one piece of flat waxed paper, and spread them out how they wanted.

Tips - Don’t let one area get too thick with crayon shavings or it will take a long time to melt. Use the construction paper leaf cut-out as a guide to show your kids where the crayons shaving should be on the waxed paper, so they don’t end up disappointed that you can’t see all the yellow they put in the far corners.


Remember - Two waxed papers

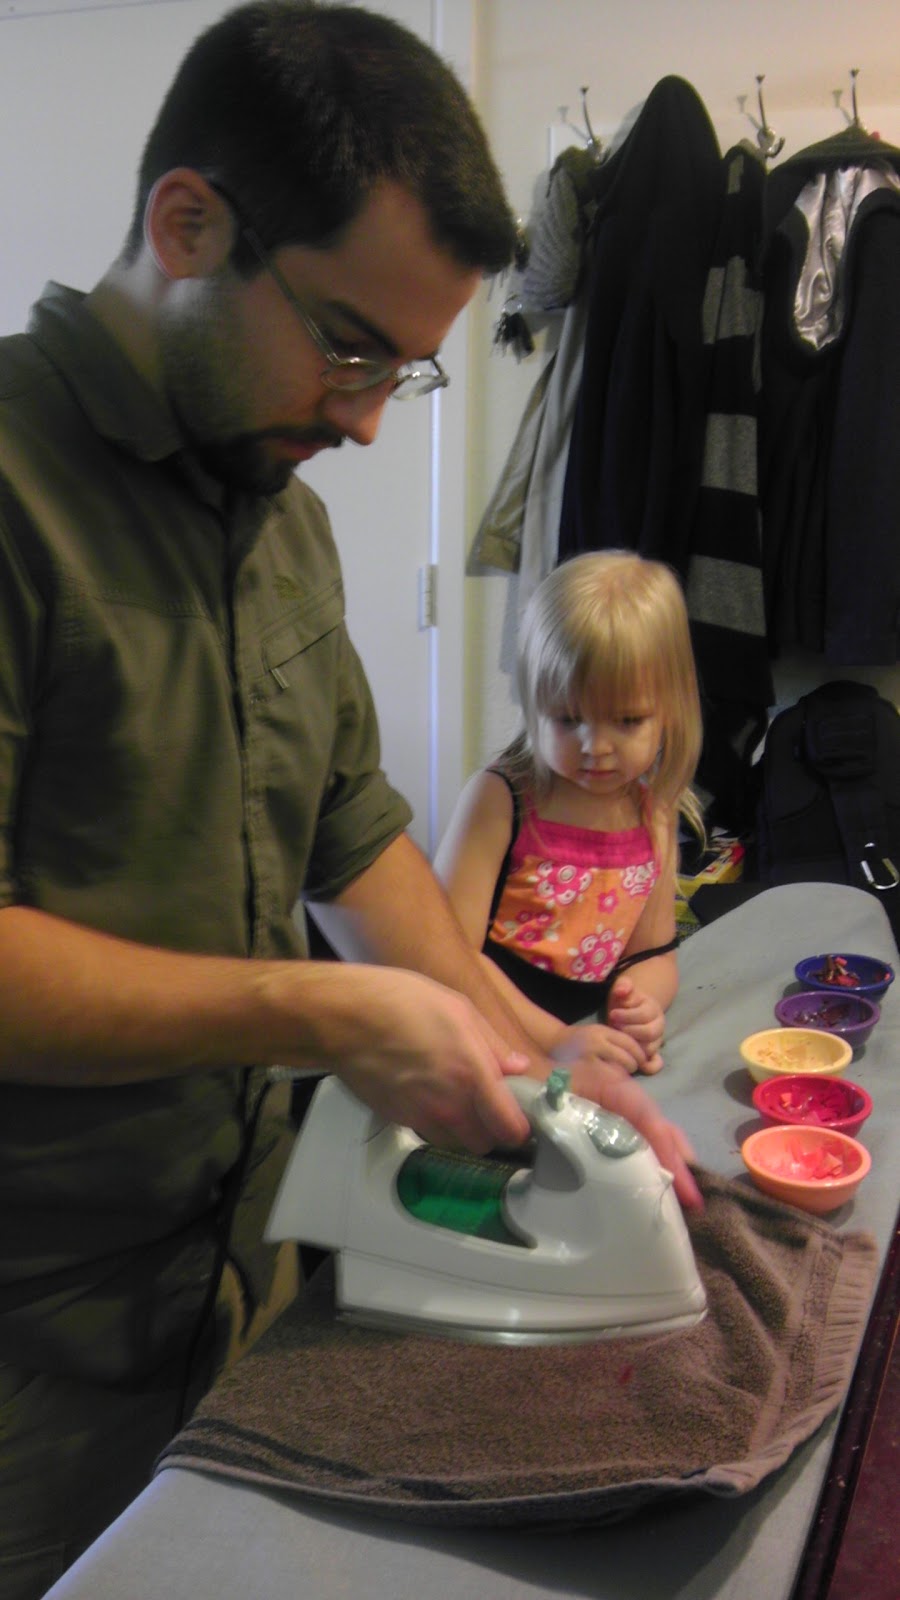
5. Sandwich and iron - This is grown-ups only. We let the kids watch, but at the other end of the ironing board. We placed the second square of waxed paper on top of the crayon shavings (now we have crayon shavings between two squares of waxed paper. If you don’t... redo step 4). Then, we carefully draped a hand towel that we didn’t particularly care about (incase it got wax on it) over the top, and ironed it.

We had our iron on a very low setting at first, but getting to warm the wax all the way through the towel was a bit of a chore. Turning it up to about a medium setting seemed to be just right. Test what works for you. It shouldn’t take more than a couple of minutes to melt all of the wax nicely.

6. Apply construction paper - Once the wax had dried back to a solid state (within a few minutes), we lined up the construction paper leaf cut-outs on either side of the wax paper by holding it up to the light to be sure we got them straight. Then I used clothespins to hold all of the pieces together in that position while I glued them.

You might be able to let your kids do this, but I wasn’t confident in my kids’ ability to be conservative with the glue. I dried them between books for the first few hours to make sure the paper didn’t ripple too much, so avoiding glue spills was important.

7. Trim - Once they were dry (or at least mostly dry), we trimmed the edges to make nice squares with no waxed paper showing. This is also something kids could do, with appropriate scissors of course, but mine are a bit crazy with the scissors and go overboard with excitement. So, grown-ups did this.


This project really didn’t take very long, and clean up was so easy. All of the mess (what little there was) was dry. Crayon shavings and paper trimmings were an easy fix. Then I just had to put the iron and ironing board away and toss the towel in the laundry. No messy kids, no glitter, no weird substances of questionable origin.